Setting up shipping rates in your Shopify store can be a game-changer for your business. Discover how to optimize your strategy and ensure a seamless shopping experience for your customers. In this guide, we’ll walk you through the essential steps to setup shipping rates Shopify style, so you can boost your sales and customer satisfaction.
What are Shopify shipping rates?
Shipping rates (sometimes referred to as shipping fees) are the amount of money a store charges its customers for the handling and shipping process. This amount may include packaging, shipment fee, tracking charges, and so on.
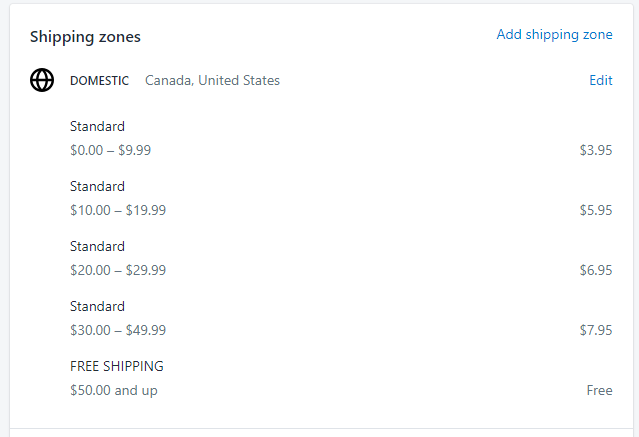
Shipping rate is important for both Shopify merchants and buyers.
For Shopify merchants, depending on how much the fee is, shipping fees can impact the overall cash flow and consequently its profitability. Therefore, it is important that merchants keep the shipping fee low enough to make it attractive for customers but also high enough to keep them profitable.
For Shopify customers, the shipping fee is equally a big thing, as it affects the total they have to pay for a purchase. They would certainly love free shipping, and as the matter of fact, UK high street brands almost always set a free shipping threshold to encourage customers to spend more, and it works! But free shipping isn’t ideal for all merchants and all orders. Sometimes the shipping area is too far that free shipping would make you lose money, but sometimes it’s the packaging of the shipment that creates the financial burden.
So having a smart shipping rate strategy is without a doubt critical to a business, but how do you set up these conditions on your Shopify store?
How to set up Shopify shipping rates?
Setting up shipping rates with Shopify admin
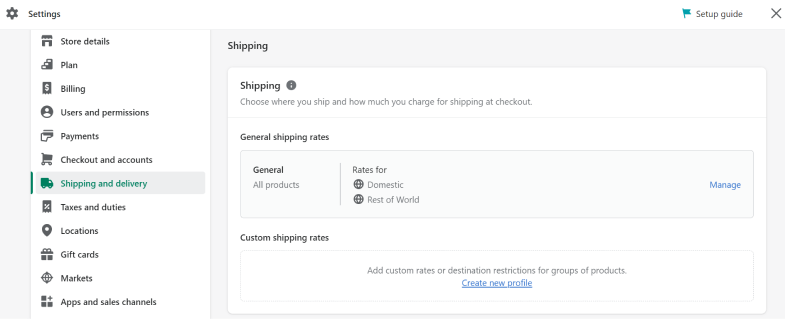
Shopify does provide a way to set up these different shipping rates. What you can do is go to Shopify Admin, go to Settings and click on Shipping & Delivery.
At this point, you can create a new profile or use a General profile to create shipping rates. First, you create a shipping zone where you want to ship based on countries and territories. Then you click on Add rate. You can also click on Add conditions to create a customized fee based on weight and order value.
The weight can be retrieved from the product information, so by setting the condition to the order’s weight, the system will automatically accumulate the weight of the entire order to calculate the eligible shipping rate.
If you wish to produce a free shipping offer without a promo code, you can simply set the condition to order price, and set the shipping fee to 0 with the condition you design.
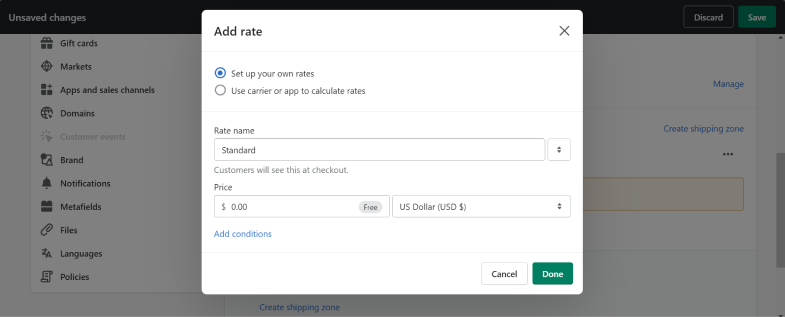
Remember that the rate you’re making applied to the countries specified by your profile only.
If you find the profiling and rates system too complicated or simply haven’t met your local shipping expectation, read on, we’ll provide you with a more sensible solution.
Setting up shipping rates using DingDoong
Introducing DingDoong – your solution to all things logistics. With DingDoong, not only can you limit the postal code area you want to ship, your shipping rates set up will easily be done within a few steps:
- In the Rate tab, create a shipping zone.
- Include (or exclude) a limitless number of postal codes in the same zone
- Choose to create a shipping rate based on order value or total weight
- Click Add rate
- You can continue adding new rates per your interest
- Remember to save
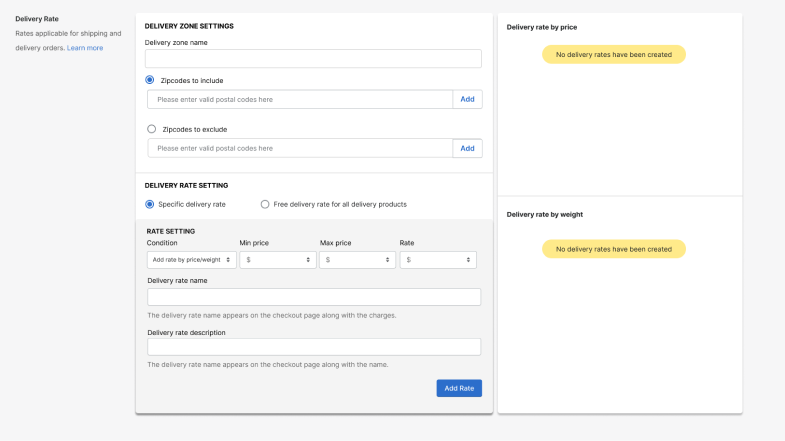
If you want to allow free shipping, simply choose the free shipping option instead of specific delivery rate.
Okay, but how do these rates apply should the order be eligible for multiple rates?
Initially, the system verifies if the postal code customers enter is eligible for shipping. If the postal code is out of the shipping zone specified by you on the app, DingDoong will simply forbid them from checking out. Once the postal code is clear to check out, the app will show all suitable shipping fees. Supposedly, when an order qualifies for multiple shipping rates, you will have the option to choose which rates to display: all, the lowest, or the highest. This gives you the flexibility to select the rate that best suits your needs.
There are several reasons why the app is incredibly useful in comparison to using Shopify’s admin and is trusted by merchants everywhere.
First of all, the app allows you to set shipping rates to regions as small as postal code area, while Shopify admin allows permission to only provincial level. You can also include multiple postal codes into 1 zone to conveniently edit the according rate as well. This is crucial because some businesses are only regional and there aren’t many apps with the similar function.
Second, it’s much easier to set up and view and add notes to the setup to clarify things. This is only a minor difference, but our merchants seem to love that. It explains to customers why the rates differ, and it helps to manage their expectations.
On top of that, the function works well with the app’s other features such as selecting delivery/pickup day or time slot of the day and Group Order. So for example, you want to set a high threshold for free delivery, so you set up Group Order to encourage people to get their friends, family, and colleagues involved to meet the minimum spending easier. A best-in-class solution for you and your business. That’s 1 less headache!
Set up Shipping rates for your Shopify store 👉
Customize shipping rates to maximize your profits while keeping your customers satisfied.
Try DingDoong Free
Add a date picker to your Shopify checkout today — no developer needed.
Start free trial →